
Da House Graphic Tutorials
Adobe ImageReady
ImageReady is the animation program bundled with current versions of PhotoShop. In this program you can create your own animated images, giving them all sorts of movements and special effects.
To begin with, lets take a look at the workspace.
Click the thumbnail for a larger view.
The one thing you will notice right off is that the workspace in ImageReady is almost identical to that of PhotoShop, making it easier to recognize each tool and feature. Once you are familiar with one program, you will automatically know what each tool and function can do in the other.
With the exception of a few tools in the tools palette, the major difference between the two programs amount to the single addition of the ANIMATION PALETTE. This is where all your images will begin to take shape with each added movement or position change.
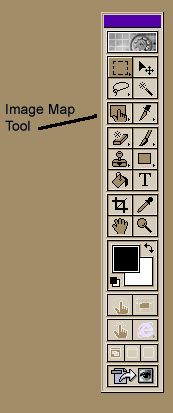
Now let's talk a bit about the different tools in the ImageReady tools palette. Although much of the tools are the same as in PS, you will find however that they've been slightly rearranged in IM. Once you're familiar with each, you will begin to recognize them by their images.
| On
the image at the right you will see reference to a tool called IMAGE
MAP. Using this tool will allow you to place "hot spots" in
your images that when clicked will take the visitor to a linked page or
another site. These are particularly useful in web sigs when you want to
promote your own web site or forum.
Using "hot spots", or image maps, on images works on the same principle as adding a link to an image with the <a href> anchor tag. However, instead of using HTML tags to code the link yourself, setting the variables, such as the link URL and/or target, for an image map and then saving the HTML file along with the image will automatically create "hot spots". NOTE: All the variables needed to be set in order to create an image map can be found on the ANIMATION PALETTE. Simply click the tab marked IMAGE MAP.
|
 |
| IMAGE MAPS
To create one of these puppies you first need an image on which to put the "hot spot". If you already have an image in mind saved on your hard disk, whether or not it is animated, go ahead and open it within ImageReady. We'll talk about animating it later on. *g* Next, select the IMAGE MAP TOOL from the tools palette. Again as in PS, using the ALT key while selecting the tool you can switch to either rectangular, circular or polygonal shapes. I usually use the rectangular shape since it is easiest to configure. For some reason the circular shape never goes where I want it to. Next, place the image map tool overtop of your image and "drag" it over the image until you have your preferred size. It's best to keep the edges of the "hot spot" within the boundaries of the image. Once you've done this, click on the IMAGE MAP tab on the ANIMATION PALETTE to open the image map options. Here is where you will find the variables you need to set in order for the image map to work. In the text box marked URL, simply type in the URL of the site or page where you want the "hot spot" linked. Next, add any ALT text that you want displayed when a visitor's mouse rolls over the image. This could be in the form of a special message or simply describing where the link goes. If you don't want any ALT text displayed you can leave this blank. Now you will need to save the image and the HTML file that goes with it. Usually when images are included in a web sig or on a web page, all you need to do is add the <img src> tag, which points to the reference where the image is stored, such as on your web server or on a specific web page or site. When coded properly, the HTML would look like this: <img src="http://yourdomain.com/images/imagefilename.gif" width="000" height="000" alt="any text you want displayed"> Of course there are other tags you can add to the above, such as aligning the image to either side or the center of the page, or even placing it within the boundaries of a table. But we won't cover that here. Not yet anyway. *g* Using an image map requires a bit more code than the above in order to display it properly, such as the co-ordinates pointing to where exactly the "hot spots" are located. These are coded by the program in a series of numbers that resemble latitude and longitude. Sounds confusing, but it's really not. Below is a sample of code for a simple image map created in ImageReady. All tags are in blue so you can see what they are: <!-- ImageReady Slices (Untitled-1) --> Nobody expects you to remember all that. Even I can't code image maps w/o help. But it is important to be able to recognize the tags and what each does, especially if you want to be able to someday code your own web pages. And, let's face it, that's basically where we're all headed. |
|
| Rest your mouse over the image at right to see how the above image map performs when the additional HTML code is saved. It looks pretty much the same as a link coded with the <a href> tag. |
|
| That's because
you can't actually
"see" the image map, but you know it's working when your mouse
moves over the image and the link is displayed in your browser's status
bar.
Normally for an image as small as the one above you wouldn't need to use an image map. Just a simple <a href> anchor tag could link the image to a site or page. However, whenever using images larger than the one above, such as a web sig that contains text pointing to several different sites or pages, you can then use an image map to outline each link. When the site visitor rolls over the image map, each link to each respective page is displayed. Therefore, using image maps allows you to create multiple links from one single image. To save your image and its HTML file:
n addition to saving the image itself, this method will also save a file on your hard disk that contains all the necessary code needed to display your image map on a web browser. Without this HTML file your image might be displayed, but the image map will not work. Think of an image map as an invisible road map to a site as yet unseen. When a visitor to your web page or forum rests their mouse overtop your image, the invisible map begins to work. With one click of a visitor's mouse they are whisked away to another page. Although a tad more complicated than simple <img src> coding, image maps can provide a more professional quality to any web page or web sig.
|
|
| Back to beginning of tutorials... | Continued on next page... |

Last revised February 28, 2002
Problems or comments concerning this website? Email webmistress.
